
Nutanix Sizer with Live Optics - Basic Raw Sizing: A Step-by-Step Guide
- Taylor Norris

- Dec 10, 2024
- 6 min read

In today's digital-first world, businesses are constantly seeking efficient and scalable infrastructure solutions. Hyper-converged infrastructure (HCI) is becoming increasingly popular as it integrates storage, computing, and networking into a single solution, allowing organizations to adapt quickly to evolving needs. Nutanix, a leader in this space, offers powerful tools like Nutanix Sizer and Live Optics to streamline infrastructure planning. This guide will walk you through leveraging these tools to create a raw sizing for your infrastructure.
Note: If possible, I recommend using Nutanix Collector instead of Live Optics. See my post on Nutanix Collector here.
What is Live Optics?
According to the Live Optics glossary:
"Live Optics is a free software tool that inventories and analyses your current IT environment. It automatically collects real-time data on storage, servers, data protection, and file systems, and using an intuitive dashboard and detailed graphs, delivers a holistic view of your environment. It helps to better understand your environment, optimize your IT investments, and improve your overall system capacity and performance."
Now that we know what Live Optics is, let's jump into the fun stuff and look at the steps to create a raw sizing using Live Optics and Nutanix Sizer.
Raw Sizing with Live Optics & Nutanix Sizer
Step 1: Download and Run Live Optics
First, download and run the Live Optics collector. If you haven't done so yet, follow the instructions provided here.
Step 2: Login To Live Optics Portal
Once you have the Live Optics Collection, log in to the Live Optics UI and select the project you created.

Here you will see your Environment Overview. Take note of the CPU, Capacity, and Memory widgets.

Step 3: Logging into Nutanix Sizer
Next, navigate to the Nutanix Sizer portal and log in using your credentials.
Step 4: Create New Scenario

Once logged in, click on the Create New Scenario button to begin a new configuration.

Give the Scenario a Name : Start by providing a meaningful name for the scenario. This should be descriptive and easy to reference later, such as the customer’s name or project type (e.g., "ABC Corp – Hybrid Cloud Expansion").
Select the Opportunity : Next, choose the appropriate sales opportunity linked to the customer. This helps in associating the scenario with the correct opportunity and tracking its progress. If there isn't an opportunity yet you can select "I don't have an opportunity." (you might not see this option if you aren't a Nutanix employee)
Select the Cluster Environment : Specify the cluster environment that best suits the customer’s needs. Options typically include "Create a new Cluster Environment" or "Upgrade or expand an existing Cluster Environment."
Select Portfolio 2.0 : From the list of Nutanix portfolios, choose Portfolio 2.0. This selection ensures you're using the latest Nutanix offerings and capabilities, providing the customer with the most up-to-date solution.
Select the Installation Country : Finally, select the country where the solution will be installed. This helps account for any region-specific considerations such as hardware availability, compliance, and shipping logistics.
Step 5: Define Scenario Objectives

Defining clear scenario objectives is crucial for designing a solution that meets the customer’s needs and aligns with their business goals. Here’s how to define the scenario objectives in Nutanix Sizer:
Executive Summary : Begin with an executive summary outlining the business problem your customer is facing. Provide a brief description of how Nutanix will solve this problem, along with a high-level overview of the desired outcome. Include how the solution will scale over time to accommodate future growth or changing needs. This summary serves as a roadmap for both the design and customer expectations.
Requirements : Next, define the core technical requirements of the scenario. This includes:
Workload types (e.g., databases, virtual desktops, or general-purpose VMs)
Services that must be provided (containers, file storage, VMs)
Number of users or VMs
Specific resource requirements including:
Number of cores
Amount of RAM
SSD and HDD storage capacity
NIC (SFP+ vs 10GBASE-T)
Constraints : Identify any constraints that could impact the design of the solution, such as:
Project schedules or deployment timelines
Budget limitations that may restrict certain hardware or software options
Any other notable limitations, like compliance regulations or existing infrastructure dependencies, that must be considered (availability, security, etc)
Key Assumptions : Document key assumptions that influence your design choices. These could include assumptions about future growth, application performance expectations, or potential changes in workload types. These assumptions should be communicated with the customer to avoid any misalignment during deployment.
Key Risks : Identify any risks that could impact the success of the deployment or timeline. Risks could involve:
Unexpected changes in customer requirements
Technical complexities that may delay the project
External factors, such as supply chain issues, that could affect hardware availability. Understanding these risks early allows you to prepare contingencies and mitigate potential delays.
Source Environment Description : Provide a description of the customer's current environment that feeds into this sizing decision. This could include details such as:
The existing applications and workloads
Software versions in use
Current hardware infrastructure
This context ensures the solution integrates seamlessly with the customer’s current setup and provides the necessary improvements.
Step 6: Create the Scenario

After filling out the necessary details, click the Create button to proceed.
Step 7: Create Workload
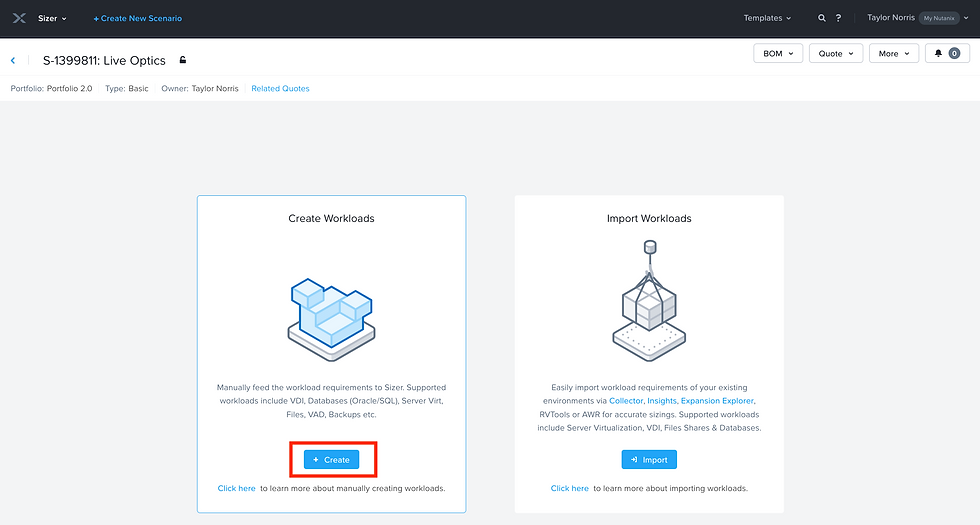
Now that you have your scenario created, proceed to set up your workload. Click on "Create Workload."
This section allows you to input specifics about the workloads that will run on your Nutanix cluster, helping ensure optimal performance.
Step 8: Workload Details

Provide a descriptive workload name that will help identify it later.
Next, select the workload type. Under Workload Type, choose "Cluster Sizing (Raw Input)." This is vital, as it allows for the input of raw performance data captured via Live Optics.
Step 9: Selecting a Processor

Your choice of processor can greatly influence the performance and efficiency of your Nutanix solution. Review the available processors and select one that aligns with the performance specifications gathered from your Live Optics data. For example, choose a processor with a minimum of 3.1 GHz if that is what the previous system used.
To find the processor of the previous system, click on the "Performance" tab in Live Optics, then select the "Inventory" tab in the bottom middle pane. If you scroll to the right, you will see the processor under the CPU column.

Step 10: Enter Cluster Sizing Data
We can get the high level cluster sizing data from the "Environment" tab in Live Optics.

For this sizing I am going to use the "Net CPU", "Total" capacity, and "Total Memory" values to create a conservative sizing.
You could also use "peak cpu", "used" capacity, and "peak memory usage", adding some room for growth, if the customers environment appears to be oversized. Be sure to discuss these values with the customer!

Toggle Cluster Sizing by GHz
Under the Cluster Sizing section, enable the Size by GHz toggle to configure CPU sizing based on GHz.
Enter CPU, RAM, and Storage
Input the required values for CPU (434 GHz), RAM (2048 GiB), and Storage (55 TiB SSD) for the workload, adjusting as needed. (note: we had to convert the RAM from TiB in Live Optics to GiB in Sizer).
Click "Save & Review Cluster"
Once all values are entered, click "Save & Review Cluster" to review the current configuration and ensure everything is accurate.
Step 11: Select Platform Settings
Select your preferred platform settings, including hardware vendor, data center models, minimum CPU frequency in GHz, and storage type.
I am going to take the defaults here.


Step 12: Apply Settings

After selecting your preferred settings, click the "Apply" button to finalize the configuration.
Step 13: Review Solution Tab

Click the "Solution Tab."

This will generate a tailored Nutanix build based on your inputs.
Conclusion
Designing an optimized Nutanix solution doesn’t have to be complicated. By leveraging the powerful combination of Live Optics and Nutanix Sizer, you gain the insights and tools needed to create a solution tailored to your IT environment. Live Optics provides a detailed understanding of your current infrastructure, while Nutanix Sizer translates that data into actionable configurations. Whether you’re planning for growth, optimizing performance, or addressing specific workload requirements, this streamlined process ensures accuracy and scalability. Start your journey toward a smarter, more efficient infrastructure today!
Helpful Links


Comments